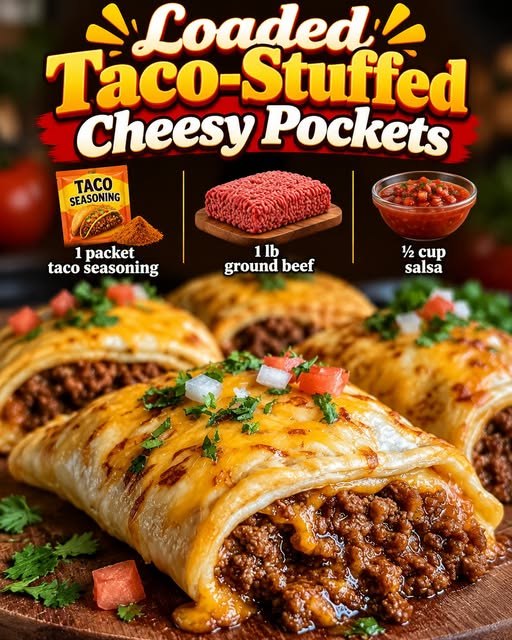
There’s something undeniably comforting about a warm, cheesy snack that combines the bold flavors of Tex-Mex cuisine with the convenience of a handheld meal. Loaded Taco-Stuffed Cheesy Pockets deliver just that—a perfect blend of creamy, savory, and tangy ingredients wrapped in a soft tortilla and baked to golden perfection. Whether you’re looking for a quick weeknight dinner, a crowd-pleasing appetizer for game night, or a fun way to use up leftover taco ingredients, these pockets are sure to become a staple in your recipe rotation.
What sets these pockets apart is their versatility and simplicity. The filling is a rich, creamy mixture of seasoned ground beef, tangy salsa, and melted cheddar cheese, all wrapped in a soft tortilla and brushed with melted butter for a crisp, golden finish. The result is a dish that’s as satisfying as it is easy to make. Plus, the recipe is flexible enough to accommodate various dietary preferences, making it a great option for families or gatherings with diverse tastes.
Why This Recipe Works
These Loaded Taco-Stuffed Cheesy Pockets are a hit for several reasons:
- Rich, Creamy Filling: The combination of softened cream cheese, salsa, and shredded cheddar creates a lusciously gooey center that melts beautifully in the oven. This creamy base complements the savory beef and adds a layer of indulgence to every bite.
- Pantry-Friendly Ingredients: Most of the ingredients are likely already in your kitchen, making this recipe both economical and convenient. Ground beef, taco seasoning, salsa, and tortillas are staples that can be easily sourced or substituted.
- Simple Preparation: The recipe is straightforward, requiring minimal effort and no specialized skills. Cooking the beef, mixing the filling, and assembling the pockets are all quick and easy steps that come together in under 30 minutes.
- Customizable: Whether you prefer spicy, vegetarian, or gluten-free options, this recipe can be easily adapted to suit your tastes. Add jalapeños for heat, swap the beef for black beans, or use gluten-free tortillas for a dietary-friendly version.
A Detailed Ingredient Guide
Each ingredient in this recipe plays a crucial role in creating the perfect balance of flavors and textures. Here’s a closer look at what you’ll need:
- 1 packet taco seasoning: This brings the classic, bold Tex-Mex flavor that ties all the ingredients together. Choose a seasoning blend that suits your taste, whether mild, medium, or hot.
- 1 lb ground beef: The hearty base of the filling, ground beef soaks up the taco seasoning and provides a savory, satisfying texture. For a leaner option, you can use ground turkey or chicken.
- ½ cup salsa: Adds moisture and a tangy kick to the creamy cheese mixture. Opt for your favorite salsa—whether mild, medium, or hot—and adjust the heat level to your preference.
- 8 oz cream cheese, softened: Creates a rich, creamy foundation that holds the filling together. Softening the cream cheese ensures a smooth, lump-free mixture. For a lighter option, you can use low-fat cream cheese or Greek yogurt.
- 2 Tbsp melted butter: Brushed on top of the pockets, melted butter gives them a golden, crisp finish. You can also use olive oil or cooking spray for a lighter option.
- 1 cup shredded cheddar cheese: Melts into gooey deliciousness and adds that perfect cheesy pull. For a different flavor, try Monterey Jack or a Mexican cheese blend.
- 12 (6-inch) tortillas: The soft, foldable canvas that wraps up all the goodness inside. Choose flour tortillas for a traditional texture, or corn tortillas for a gluten-free option. Ensure they are large enough to hold the filling without tearing.
Step-by-Step Preparation
Making these Loaded Taco-Stuffed Cheesy Pockets is a breeze. Follow these steps to create the perfect handheld snack:
- Preheat the oven and prepare the baking tray: Preheat your oven to 350°F (175°C). Lightly grease a baking tray or line it with parchment paper for easier cleanup.
- Cook the ground beef: In a medium skillet over medium heat, cook 1 pound of ground beef until fully browned, breaking it up with a spoon or spatula as it cooks. Drain off any excess grease to keep the pockets from getting soggy.
- Add the taco seasoning: Stir in 1 packet of taco seasoning according to the package instructions (usually with a bit of water). Let it simmer for a few minutes until the mixture thickens and the flavors combine.
- Prepare the cheesy filling: In a mixing bowl, combine 8 oz softened cream cheese and ½ cup salsa. Mix until smooth and creamy—this will be your luscious base layer.
- Assemble the pockets: Lay out one 6-inch tortilla on a clean surface. Spread 1–2 tablespoons of the cheese mixture in the center. Add a spoonful of the seasoned beef, then sprinkle with shredded cheddar cheese (about 1–2 tablespoons). Fold the tortilla like a burrito—sides in first, then roll it up tightly. Place seam-side down on the prepared tray. Repeat with the remaining tortillas and filling.
- Brush with butter: Lightly brush the tops with 2 tablespoons of melted butter. This step helps create that golden, crispy finish in the oven.
- Bake until golden and crisp: Bake for 15 minutes or until the tortillas are golden brown, slightly puffed, and the cheese inside is bubbly.
- Cool slightly and serve: Let the pockets sit for 5 minutes (if you can wait!), then serve warm with your favorite toppings.
Practical Tips and Common Mistakes
To ensure your Loaded Taco-Stuffed Cheesy Pockets turn out perfectly every time, keep these tips and common mistakes in mind:
- Warm the tortillas: Slightly warm the tortillas in the microwave for 10–15 seconds before folding. This makes them more pliable and less likely to tear.
- Soften the cream cheese: Ensure the cream cheese is fully softened before mixing with the salsa. This prevents lumps and creates a smooth, creamy filling.
- Avoid overstuffing: Be mindful not to overfill the tortillas. Too much filling can cause them to split or leak during baking.
- Use parchment paper: Line the baking tray with parchment paper for easier cleanup and to prevent the pockets from sticking.
- Check for doneness: Keep an eye on the pockets as they bake. They are done when golden brown and slightly puffed, usually around 15 minutes.
- Customize the filling: Feel free to add extra toppings or adjust the seasoning to your taste. Jalapeños, black beans, or extra cheese are great additions.
Serving Ideas
These Loaded Taco-Stuffed Cheesy Pockets are delicious on their own, but pairing them with the right sides and toppings can elevate the experience. Here are some serving ideas to consider:
- Toppings: Serve with guacamole, sour cream, fresh salsa or pico de gallo, shredded lettuce, and sliced olives for added crunch and flavor.
- Sides: Pair with Mexican rice, refried or black beans, and grilled corn on the cob for a complete meal.
- Drinks: Enjoy with iced tea with lime, sparkling lime soda, or classic margaritas (for the adults!).
Make-Ahead and Storage Guidance
These pockets are excellent for meal prep and can be stored for later enjoyment. Here are some tips for making ahead and storing:
- Make ahead: You can assemble the pockets and store them in an airtight container in the refrigerator for up to 24 hours before baking. This is great for meal prepping or party planning.
- Storage: Store leftover pockets in an airtight container in the fridge for up to 3 days. Reheat in the microwave for 45–60 seconds or in a 350°F oven for 8–10 minutes to restore crispiness.
- Freezing: For best results, freeze the pockets unbaked. Wrap each pocket in foil or plastic wrap, then store in a zip-top bag. When ready to eat, bake from frozen at 350°F for 20–25 minutes or until heated through and golden.
Useful FAQs
- Can I use chicken instead of beef? Absolutely! Shredded rotisserie chicken works beautifully and soaks up the taco seasoning just like beef. It’s a great way to use up leftovers too.
- Can I air fry these instead of baking? Yes! Pop them in your air fryer at 375°F for about 10 minutes. They come out golden, crispy, and just a little bit addictive.
- Can I make them ahead of time? Definitely. You can assemble the pockets, store them in an airtight container, and refrigerate for up to 24 hours before baking. Great for meal prepping or party planning.
- Are they freezer-friendly? They sure are. For best results, freeze before baking. Wrap each one tightly in foil or plastic wrap, label them, and bake straight from frozen when you’re ready. Just add a few extra minutes to the cook time.
- What cheese works best? Cheddar is the classic choice, but Monterey Jack or a Mexican blend also melt beautifully and add different flavor notes. Use whatever you love—or mix them up!
Loaded Taco-Stuffed Cheesy Pockets are more than just a meal—they’re a warm, cheesy hug wrapped in a tortilla. Whether you’re whipping them up for a busy weeknight, a cozy movie night, or a fun party appetizer, this recipe delivers comfort, flavor, and a whole lot of smiles. What I love most is how adaptable they are. You can customize the filling, prep them ahead, freeze for later, and still get delicious results every time. They’re fun to make, even more fun to eat, and guaranteed to become a family favorite.
Recipe source: Original recipe
Recipe Card
Loaded Taco-Stuffed Cheesy Pockets
Ingredients
Method
- Preheat oven to 350°F (175°C). Lightly grease a baking tray.
- Cook ground beef in a skillet until browned. Drain fat.
- Stir in taco seasoning per packet instructions.
- Mix cream cheese and salsa in a bowl until smooth.
- Lay out tortilla, add cheese mixture, beef, and shredded cheddar.
- Fold burrito-style and place seam-side down on tray.
- Brush with melted butter.
- Bake for 15 minutes or until golden and crisp.
- Cool slightly and serve with desired toppings.